Sometimes when you use a third party importing tool, your products aren』t re-saved the traditional way. This is also the case where products have been manually inserted into the database.
If the save_post function isn』t called properly during import this can lead to an issue with some products not respecting their visibility settings.
After importing or making any manual database changes (or changes that save the post via any other bulk management plugin), we recommend re-initializing the product visibility meta.
To do this we have created a new button in the Help area of the WooCommerce Wholesale Prices Premium settings:

How To Change 「Wholesale Price」 Text In Free Version
In the free version of the WooCommerce Wholesale Prices plugin (download here) we have packed the code full of useful filters and actions that you can use to extend functionality.
One common thing people want to do is change the bit of text that shows before the price on your wholesale prices. This defaults to 「Wholesale Price:」
To do this we prefer you don』t edit the plugin code directly as this tweak will be removed next time you update the plugin. Instead, we have a filter for it, just place the code in your functions.php file:
add_filter('wwp_filter_wholesale_price_title_text', 'override_wholesale_text', 10, 1);
function override_wholesale_text($wholesaletext) {
return 'Trade Price:';
}
Of course, all of this and more is easily tweakable in the WooCommerce Wholesale Prices Premium add-on plugin. You can check our KB article here to do this in our Premium version.
How To Allow Shop Managers To Edit Users & Wholesale Users In WooCommerce
On WooCommerce version 3.4.6, they released a security fix that prevents shop managers to edit other users except for users with customer roles.
This means from this version onwards, Shop Managers will not be able to edit Users with the wholesale user roles generated from our WooCommerce Wholesale Prices and Prices Premium plugin by default.
If you want to just let your Shop Managers edit those users, you will need to do two things:
Allow them to edit users
Allow them to edit users with the roles that you say they can
Allow Shop Managers To Edit Users (Customer Role Users Only)
The first part you just need to adjust the capabilities of the Shop Manager role:
/* Lets Shop Managers be able to edit users again */
function wws_add_shop_manager_user_editing_capability() {
$shop_manager = get_role( 'shop_manager' );
$shop_manager->add_cap( 'edit_users' );
$shop_manager->add_cap( 'edit_user' );
}
add_action( 'admin_init', 'wws_add_shop_manager_user_editing_capability');
Note that the above snippet will not let Shop Managers promote/demote a user, meaning they can』t change the User Role of a customer. Read on for how to do that.
Add The Ability To Edit Users With Wholesale Roles
Next, you need to say which user roles the Shop Managers are allowed to edit. If you don』t do the following, it will mean they can only edit users with Customer role.
/* Lets Shop Managers edit users with these user roles */
function wws_allow_shop_manager_role_edit_capabilities( $roles ) {
$roles[] = 'wholesale_customer'; // insert the wholesale role here, copy+paste this line for additional user roles
return $roles;
}
add_filter( 'woocommerce_shop_manager_editable_roles', 'wws_allow_shop_manager_role_edit_capabilities' );
If you want to allow your Shop Managers to also be able to promote/demote users from Customer to Wholesale Roles, you will need to explicitly give them that capability. You can do so by editing the top snippet to add the following line:
$shop_manager->add_cap( 'promote_users' );
Please use this snippet to allow shop managers to edit users with the default wholesale_customer roles. If you have additional wholesale roles, you can include them in roles in the snippet, just copy and paste the line and adjust to use the proper role slug.
The Full Code Snippet (Includes Everything Above)
/* Lets Shop Managers have the capability of editing and promoting users */
function wws_add_shop_manager_user_editing_capability() {
$shop_manager = get_role( 'shop_manager' );
$shop_manager->add_cap( 'edit_users' );
$shop_manager->add_cap( 'edit_user' );
$shop_manager->add_cap( 'promote_users' );
}
add_action( 'admin_init', 'wws_add_shop_manager_user_editing_capability');
/* Lets Shop Managers edit users with these user roles */
function wws_allow_shop_manager_role_edit_capabilities( $roles ) {
$roles[] = 'wholesale_customer'; // insert the wholesale role here, copy+paste this line for additional user roles
return $roles;
}
add_filter( 'woocommerce_shop_manager_editable_roles', 'wws_allow_shop_manager_role_edit_capabilities' );
These snippets should be placed in your theme/child theme』s functions.php or in a drop-in or custom plugin.
NOTE: Keep in mind the above snippets change the way security operates for the Shop Manager role in your store. So please careful and ensure you understand what capabilities you are opening up.
Custom Redirections for Wholesale Registration Page
Redirection for Multiple Wholesale Registration Pages
Since we』ve introduced Wholesale Registration shortcodes to create multiple registration forms, there have been some requests on how to redirect other registration forms to a different page.
By default, the Wholesale Registration page redirects to the Wholesale Thank You page found on your WooCommerce > Settings > Wholesale Lead > General. But by using the custom snippet below, you can change the URL of the redirection based on the Page ID of the Wholesale Registration page that you want to get redirected.
add_filter( 'wwlc_create_user_response_data', function( $response ) {
$url = wp_get_referer();
$page_id = url_to_postid( $url );
if( $page_id === 5213 ) {
if( $response[ 'status' ] == 'success' ) {
$response[ 'redirect' ] = 'https://facebook.com/';
}
}
return $response;
}, 99, 1 );
Redirection based on the value of the custom field
Another useful snippet that you can use is for redirecting the user after a successful registration to a specific page based on the value/option selected in your custom field (radio).
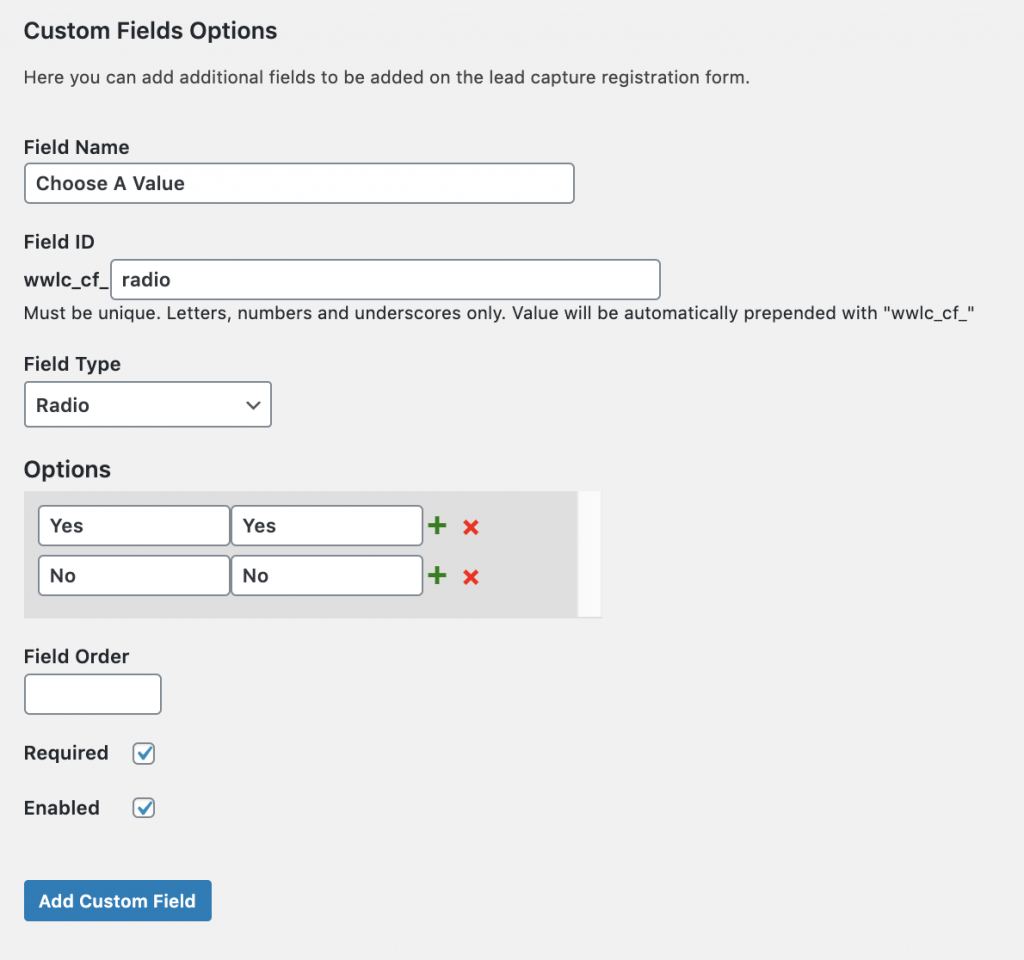
As an example, I have created wwlc_cf_radio in the WooCommerce > Settings > Wholesale Lead > Custom Fields.

function my_wwlc_register_custom_redirect( $response ) {
if( $response[ 'status' ] == 'success' ) {
$custom_field_val = get_user_meta( $response[ 'user_id' ] , 'wwlc_cf_radio' , true );
if( $custom_field_val == 'Yes' )
$response[ 'redirect' ] = 'https://wholesalesuiteplugins.com/';
}
return $response;
}
add_filter( 'wwlc_create_user_response_data', 'my_wwlc_register_custom_redirect', 99, 1 );
The snippet above will redirect the users who selected YES on the custom radio field on the Wholesale Registration page. Simply change the sample link in the snippet to your desired URL.
Redirect a Successful Registration based on the Wholesale Registration Page Language
Another redirection snippet that you can use is based on the language of the Wholesale Registration page.
The snippet below will check if the language is set to English (en_US) and it will redirect it to the URL provided.
If you wish to add more language redirection, simply add another if condition to check if the $lang variable is equal to the language the user is registering. Here』s the link where you can get the language code for the language used in WordPress. Afterward, feel free to change the respective URL for the language you want it to be redirected.
function my_wwlc_register_custom_redirect( $response ) {
$lang = get_locale();
if( $response[ 'status' ] == 'success' ) {
if ($lang=='en_US'){
$response[ 'redirect' ] = 'https://facebook.com/';
}
}
return $response;
}
add_filter( 'wwlc_create_user_response_data', 'my_wwlc_register_custom_redirect', 99, 1 );
To use the custom snippets provided above, simply put them on your theme/child theme』s functions.php to enable them to work on your site.
Please note that these custom snippets may require some coding background if you wish to further customize them.
WWS License page is showing error 404 when switching to another tab
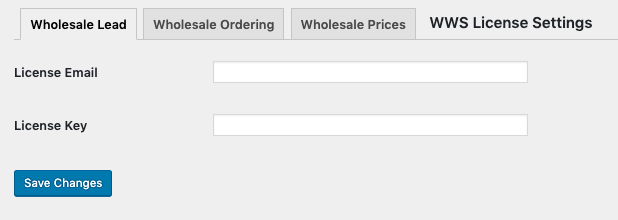
The license settings for all Wholesale Suite plugins can be found on Settings > WWS License. This page houses the three Wholesale Suite plugins where you can activate the licenses of each plugin named WooCommerce Wholesale Prices Premium, WooCommerce Wholesale Order Form and WooCommerce Wholesale Lead Capture.

If you』re having trouble switching to another tab and getting error 404 (Page not Found) this means that you』ve installed the Wholesale Suite plugins in a different root folder than the Site Address URL (WordPress > Settings > General).
In order to fix this, you』ll need to follow Method II (With URL change) from this WordPress guide about subdirectory:
Giving WordPress Its Own Directory
How to Remove Custom Fields from another Wholesale Registration Form
The WooCommerce Wholesale Lead Capture plugin allows multiple wholesale registration forms by the use of shortcodes.
However, all enabled standard and custom fields on the Wholesale Lead settings are applied to all wholesale registration forms. So if you want to remove certain fields from an individual registration form, you can use the custom snippet provided below.
add_filter('wwlc_registration_form_fields', function($fields) {
// Remove custom field on this page only
if( get_the_ID() == 1234 ) {
foreach( $fields as $key => $field ) {
// Target the Field ID of custom field
if( $field[ 'id' ] == 'wwlc_cf_example' )
unset( $fields[ $key ] );
}
}
return $fields;
} , 10 , 1);
In the example above, you need to replace the ID of 1234 to the Page ID of the wholesale registration page you want to remove the custom field on.
Next, the 『wwlc_cf_example』 string should be changed to match the field name you want to remove from that particular registration page.
You can go to WooCommerce > Settings > Wholesale Lead > Custom Fields, to check the Field ID of the custom field you want to remove.
Then put this on the functions.php file of your theme/child theme to apply the change to your Wholesale Registration Form.
Do I Need To Create Any Pages? (Shortcodes)
A couple of the plugins in our suite require pages with particular shortcodes in order to provide the front end interfaces to your wholesale customers.
In particular, the following plugins require front end pages:
WooCommerce Wholesale Order Form
WooCommerce Wholesale Lead Capture
Once you activate the plugins all the required pages will be created on the site for you with the shortcodes in place.
Here』s what the default URLs will look like, feel free to adjust them as required:
http://[yoursiteurl]/wholesale-ordering/ – this is the Order Form page
http://[yoursiteurl]/wholesale-log-in-page/ – this is the Login page for wholesale customers
http://[yoursiteurl]/wholesale-registration-page/ – this is the Registration page for wholesale customers
http://[yoursiteurl]/wholesale-registration-thankyou-page/ – this is the default Registration Thank You page wholesale customers see after registering
What If My Website Didn』t Create Those Pages?
If your website didn』t create the pages automatically during plugin activation then you can try deactivating/reactivating the plugins again or create the pages using the tool in the Help area of the settings.
WooCommerce Wholesale Order Form:
WooCommerce->Settings, Wholesale Ordering tab, click on Help in the submenu and then click Create Page:

WooCommerce Wholesale Lead Capture:
WooCommerce->Settings, Wholesale Lead tab, click on Help in the submenu and then click Create Lead Pages:

Still unable to create the pages? You also can do it manually.
Create the following pages:
Wholesale Log In Page
Content: [wwlc_login_form]
Wholesale Registration Page
Content: [wwlc_registration_form]
Wholesale Registration Thank You Page
Content: Enter a thank you for registering message to your customers! You can customise it however you like.
Wholesale Ordering
Content: [wwof_product_listing]
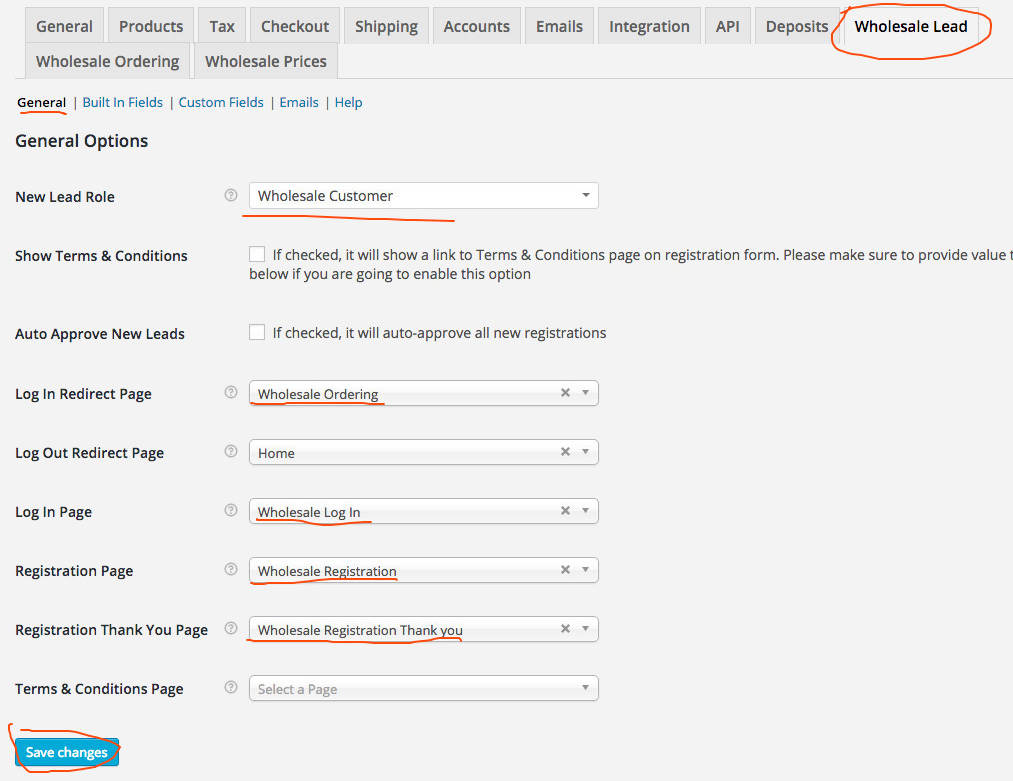
Once you』re done you will need to link up the WooCommerce Wholesale Lead Capture pages in the settings:

Registration Issues when using Internet Explorer
Our Wholesale Registration Page uses AJAX and JavaScript to save the user』s data on your registration form. However, there are some users who still use Internet Explorer and they might have some issues.
Internet Explorer is an old browser that doesn』t support JavaScript functions and AJAX very well and its extremely insecure. Microsoft has already phased out Internet Explorer and recommends switching to their modern browser called Microsoft Edge instead.
We suggest you actively recommend to your customers to use more modern browsers such as Google Chrome, Mozilla Firefox, Microsoft Edge and etc.
For external reference about Microsoft』s move on retiring the Internet Explorer, you can visit the following links:
https://www.theverge.com/2015/3/17/8230631/microsoft-is-killing-off-the-internet-explorer-brand
https://www.theverge.com/2019/2/8/18216767/microsoft-internet-explorer-warning-compatibility-solution
Javascript Event Triggers for Before and After Loading of the Wholesale Order Form
In our WooCommerce Wholesale Order Form version 1.13, we introduced new Javascript event triggers for before and after loading of the Wholesale Order Form.
These new event triggers are useful for shops that have custom Javascript functionalities. With this new feature, they can easily customize their Wholesale Order Form.
List of Triggers:
trigger: before_load_product_listing
element: #wwof_product_listing_container
parameters: [ paged , search , catFilter , $shortcodeAtts , first_load ]
trigger: after_load_product_listing
element: #wwof_product_listing_container
parameters: [ paged , search , catFilter , $shortcodeAtts , first_load ]
trigger: found_variation
element: #wwof_product_listing_table tbody tr
parameter: [ new_variation ] (this contains data of new selected variation)
trigger: added_to_cart
element: body
parameters: [ fragments, cart_hash, $button ] (this uses the same parameters as the one in WC. see https://github.com/woocommerce/woocommerce/blob/master/assets/js/frontend/add-to-cart.js#L63)
Example Usage
You can use the javascript event triggers like so:
jQuery( '#wwof_product_listing_container' ).on(
'before_load_product_listing',
function(e, paged, search , catFilter , atts , first ) {
console.log( paged );
console.log( search );
console.log( catFilter );
console.log( atts );
console.log( first );
}
);
Replace the console logs with whatever you want your code to do when this event happens.
Having an issue?
If you are still running into problems with the new event triggers, feel free to reach out to our friendly support team for advice.
How To Remove An Activated Site From Your License
You can view the list of your activated sites and remove any unwanted sites from your license by logging into your account on our website.
If you want to remove an activated site, you can simply go to your licenses page.
After logging in, go to the Licenses tab and you should be able to find the list of your activated sites. From there, you can now remove the activated sites from your license.
And if you want to register a new site, just simply activate your license on the site』s backed under Settings > WWS Settings.

